Gear for Sale

Hi Everyone,

It has been a long, long time since I have posted anything here.

After an injury in April 2015, surgery, and a break from photography in general, I find myself at the precipice of what to do in the future.

So I am currently downsizing and have gear for sale.

If you are interested in any of it, you can reach me here, email rvh34@hotmail.com, or text: 203-540-8821.

All prices are negotiable, shipping is extra.

Chimera Softbox: $250.00

36×48 Super Soft White Interior Softbox with Bowens Quick Ring speeding for Bowens.  A new speedring insert for your light: Alien Bee, Profoto, Elinchrom, etc., is available for about $20 online.


California Sunbounce:

Micro Mini silver/white with bag and attachment bracket for a light stand: $100.00

Sun Mover 32″ oval silver/white: $40.00

Avenger Light stands: $450.00 for all

2 Avenger A 420’s with wheels

1 Avenger 40″ Hollywood Grip Arm

1 Avenger D600 Boom Arm


Promaster Tripod Dolley: $40.00


Impact 19″ Fluorescent light: $40.00

Avenger F900 Multi Attachment Bracket: $40.00


BH Photo Event Space Next Week

Tags

, , , , , , , , , , , , , , , , , ,

Hi Everyone,

I apologize for not posting for a while.  I’ve been busy and have neglected the blog.

Next week on December 28, I’m heading to BH Event Space to run a presentation from 1-3 on the Humble Umbrella.

BH Event Space

screen-shot-2016-12-21-at-9-51-12-am

I just received the new Photoflex Diffusion Screen for the 45″ convertible umbrella.  For those of you who know my work or work in photography education, you know that I love this umbrella.  Now, with a diffusion screen, this umbrella system is now complete.

Here is the link to Photoflex:

Photoflex Umbrella Diffusion

I’ll be at BH to demonstrate this wonderful piece of gear and to get a handle on it.  I’ve not shot with it, so we’ll all learn something that day.

I’ll be shooting with the incomparable Tatiana, who worked for me at the Nissin Booth this year at the Photoplus Expo:

Screen Shot 2016-12-21 at 9.47.25 AM.png

Register at the BH Event Space site and join in the fun!

Hope to see you there.

Upcoming Workshops

Tags

, , , , , , , , , , , , , , ,

Hi Everyone,

I have not been blogging lately and will make an effort to get back to it!

The rescheduled Berger Headshot workshop is this Saturday, November 5 at Berger Brothers Camera in Huntington, Long Island.  If you want to learn how to shoot multiple headshot looks with just 1-3 speed lights, then don’t miss this one.

You must register with Berger Brothers: Berger Brothers Headshot Workshop

Samples of looks from previous Headshot Workshops:

_DSC8852 _DSC8829 _DSC9033 _DSC9044 _DSC8473 2 _DSC5542_bw _DSC5510 _DSC6114

I may try to run one more workshop this year but can’t promise, so the Berger event may be the last workshop for 2016.

I am currently teaching at the Milford Adult Ed and have been asked to run another semester for Spring 2017.

If you are interested, I’ll be offering:

Advanced Lighting I

Tuesday nights, 7-9

7 week course, $40 tech fee, 4 models, constant, strobe, speedlight

Advanced Lighting II

Thursday nights, 7-9

7 week course, $40 tech fee, 4 models, all multiple light setups from 1-4 lights with speed lights and strobe lights

These classes are a great deal of fun and a wonderful learning environment to shoot with a model using different light sources.

All classes held at Foran HS, Milford, CT.  You can Google Milford Adult Ed after January 1 to register.

Thanks and see you soon!

Bob

The Model Polaroid Sitting

Tags

, , , , , , , ,

Hi and welcome back.

I’ve had a request to add a post on the model polaroid sitting.  The term polaroid to describe this look is a holdover from the film days when a polaroid camera was used to get immediate photos for a models book or during a casting.  This allowed the agency to have access to photos of the model for future use.

The look today is also called digitals.

Currently, some agencies require only a few images, but when I shoot polaroids I give the model 9 shots so that he or she is covered for every agency.  Some agencies require all the shots and some only a headshot and full body or some combination of images.

Normally, the sitting is done with the model in a two piece bathing suit and includes these looks.

If you have long hair, pull it back into a ponytail so the agent can see your face.  You can always let it out upon request.

The shots include:

Headshot front

Headshot side

2/3 body front, one side, right and left on an angle to the camera

Full body front, side, back

I always include all of the shots in the sitting so the model is covered to send images to agencies with differing requirements.

I use a single strobe light and a large softbox, like a 3 x 4 to get plenty of soft light.

_RVH7544 _RVH7543 _RVH7542 _RVH7541 _RVH7540 _RVH7539 _RVH7538 _RVH7537 _RVH7536

Once I have taken all the shots, I put them into an 8.5 x 11 format for the model’s book, like this: julie-dawson-polaroid-print-1

julie-dawson-polaroid-print-2

Polaroids can be done with a smartphone: they don’t need to be done professionally.  But if I shoot a model portfolio, I offer it as part of the package so the model leaves with a complete set of updated images.

Currently, I’ve seen polaroids done in clothing, almost like a simple commercial fashion look.  I’ve not shot them that way, but it would seem to be easy to accomplish to send images to an agency.

I hope this helps!

Till next time, keep shooting!

Milford Adult Ed and This Weekend’s Boston Workshops with Theia Studios

Tags

, , , , , ,

Hi Everyone,

I totally forgot about putting this on the meetup till I got my email from adult ed.

If you are a beginner in digital photography, I teach a Basic Digital class at the Milford Adult Ed at Foran HS.  Classes begin tomorrow night from 7-9 and go for 7 weeks.  This is a great class to learn basic to intermediate digital photo techniques.

GF119 Digital Photography – Beginners Tuition: $69

Learn how to get the most out of your digital camera: photo and file management, the card reader and more. Get creative with camera modes, flashes, compositions, and how to capture portraits and landscapes through the proper use of light. A non-refundable $40 fee is payable to the instructor at the first class. Limit: 15 students.

Robert V. Harrington, (203) 540-8821
Tuesday/Sept.27 7:00-9:00 p.m. 7 weeks Foran HS, Rm. 391 Residents: $69 Non-residents: $79 Milford Seniors: $59

There is a $40 cash tech fee due to me paid at the first class to cover all my expenses for the class

If you are an advanced shooter, I teach an Advanced Photo that is based heavily on lighting.  I’ll cover natural light, speed light, strobe light, and low cost fluorescent or constant lighting.  Models are provided for about 4 of the 7 classes.  This is Thursday nights from 7-9 at Foran HS.

GF114 Advanced Lighting – Photography II

Learn advanced lighting techniques using lightpainting, constant lights, speedlights, and strobe lights in this class and explore external light sources. Use professional lighting equipment in a multitude of ways to explore different aspects of lighting using gear from Photoflex, Westcott, Pocket Wizard and other professional brands. A non-refundable $40 fee payable to the instructor at the first class covers cost of a model for 4 of the 9 weeks. Limit: 15 students.

Robert V. Harrington, (203) 540-8821 Thursday/Sept.29 7:00-9:00 p.m. Residents: $69 Non-residents: $79

7 weeks Foran HS, Rm. 391 Milford Seniors: $59

There is a $40 cash tech fee due to me paid at the first class to cover all my expenses and model fees

You can call Judy at Adult Ed to register before the class at 203-783-3461

Also, I’ll be in Andover on Saturday night and Boston on Sunday running two outdoor lighting workshops with Theia Studios.  If you are in the area, join in the fun.  I checked the weather and it looks great for both events.  There is a discount if you book in for both.

To register, you must contact Theia Studios at:

theia-studios.com or (978) 712-9278[/url]

I hope to see some of you there!

September 17 Lighting Workshop Update

Tags

, , , , , , , , , , ,

Hi Everyone,

Here is an update to yesterday’s post.  I forgot to give specific details.

Location: Courtyard behind Shubert Theater in New Haven, CT.  This area is isolated from foot traffic and very graphic so we’ll shoot in a fashion/editorial style.

Date: September 17

Cost: $100.00

Time: 11-3

Look: fashion/editorial

Model TBD

Gear:

Two Interfit S1 battery monolights

Pocket Wizards

Sekonic Light Meter

Umbrellas and grids to show how to use the most basic gear to get amazing looks

Location image: you can park in the Crown St garage or on any adjoining street:

screen-shot-2016-05-31-at-10-18-12-am

For more information, call or text: 203-540-8821

Bring your cameras as this, as always, is a shooting event!


September 17 Location Strobe Lighting Workshop

Tags

, , , , , , , , , , , , , ,

  • Hi Everyone,

    I cancelled the Headshot Workshop in Middletown as I was having too much trouble organizing it for the day, so I’ve decided to try my luck at a location lighting workshop in New Haven.

    We’ll shoot Location Strobes.

    If you are new or are looking to move up to strobe/monolights for your kit, location shooting is a great way to use them.  With new technologies and battery packs available, location strobes are all the rage right now.

    We’ll shoot a two light kit, going from one key to adding hair or accent lights for a fashion/editorial look.

    Gear:

    Interfit S1 Monolights

    Pocket Wizards

    Skein Light Meter

    Simple modifiers: Umbrella, grids, maybe a softbox

    When you purchase moonlight kits, you normally get two lights so let’s shoot with two and get some great and creative looks.

    Model TBD

    Location is my favorite spot in the courtyard behind the Shubert Theater:

    CHANGE

Hey Bob, get the conversation started!

Getting out to shoot

Tags

, ,

Hi and welcome back.

It has been a few weeks since my last post, but with the kids in school and the summer ending I’ll be posting back to my regular schedule.

I was a bit in a professional rut this August, so I decided to jump into shooting landscapes again.  I just needed a change of scene.

Last Saturday night I stopped by Gulf Beach in Milford where I live and took a few frames.  The sky at sunset was not that great, but I used a Neutral Density and a Magenta filter to add exposure time and color to the otherwise listless sky.

If you shoot landscapes, you should have these filters.  I use the Lee Brand:

Filter Holder

3 Stop Neutral Density

Magenta

After raw conversion and some color boost, here are my three faves:

_dsc9304

_dsc9307

_dsc9310

Step outside your comfort zone once in a while or just go back to your roots.  I started my career in photography shooting flowers and then rapidly went to landscapes as I loved the light.

Keep your camera with you at all times and shoot as often as you can.  I got three great shots out of only 25 frames.

I had fun, met another photographer there, and just chatted the whole time.  Get out there and shoot!!

Till next time, happy shooting!

The Importance of Styling

Tags

, , , , , , , , ,

Hi and welcome back.

I took last week off during the lazy days of Summer.  I’ll be posting only a few times a week until September and the kids are off to school.

For today, let’s take a look at the importance of styling.

If you are a going to a photoshoot, no matter who you are or what your need, styling is very important for a few reasons:

  1. You look great after pro pampers your face and hair
  2. It makes the photographer’s or retoucher’s job so much easier when post processing
  3. If you are a model, male or female, and you can do your own styling, you will sometimes get hired over other models who can’t do this.  So as budgets shrink, learning to do it yourself is beneficial.

Now on to hair, makeup, and nails.

For hair, if you are doing a concept shoot or beauty shoot that requires you to have crazy hair, then keep it simple and clean but add body so if a fan is added you have the volume to move around.

For makeup, stick to neutral tones that enhance your eyes and overall tone.  Again, unless you are doing something specific, keep it simple and elegant.

Nails are a pet peeve of mine.  Keep them clean, manicured, and use a neutral or light tone color on them so they disappear in the image.  Don’t arrive to your shoot or job with broken nails or chipped neon purple nails.  If your hands wind up in the image, you’ll be happy you had your nails done and ready for the shoot.

Here is a proof of a shot I did a while back.

Notice how the tones of her lips, face, and around the eyes are even and neutral.  Her hair has had a blowout at a salon so that there is volume to it, even though you can’t see too much of it.  But most importantly look at her nails.  They are in great shape and the color on them blends with her skin tone, so they disappear in the image and don’t detract from her face:

_DSC8161

Because her skin is evenly toned, her hair is controlled with product, and her nails blend perfectly, retouching is easy.

Here is a final retouch done by my retoucher:

_DSC816111_rt

If you are learning to style yourself, here is a guide I got from InStyle Magazine that will help you choose colors for your skin tone:

Headshot Makeup Copy

That’s it for today.  Till next time, happy stylin’.

Attaching a California Sunbounce Tube Frame to a Lightstand

Tags

, , , , , , , ,

Hi and welcome back.

Since the price drop of the California Sunbounce Micro Mini, I’ve had several emails about the system, especially about attaching it to a lightstand.

Here is a blog re-post from a while back explaining how I do it and how you can do it cheaply.

If you have any questions about the system, email me: bob@robertharringtonstudios.com

Attaching a California Sunbounce Reflector to a Lightstand

I get this question often.  The California Sunbounce reflector system is, I think, the best on the market.  However, you do pay for that quality!

California Sunbounce

The CS Micro Mini was the first piece of professional gear I purchased after my camera and lenses, and it has been with me for 8 years!

I currently own 2 Micro Minis, 1 4×6, and one of the 36″ Sunswatters.

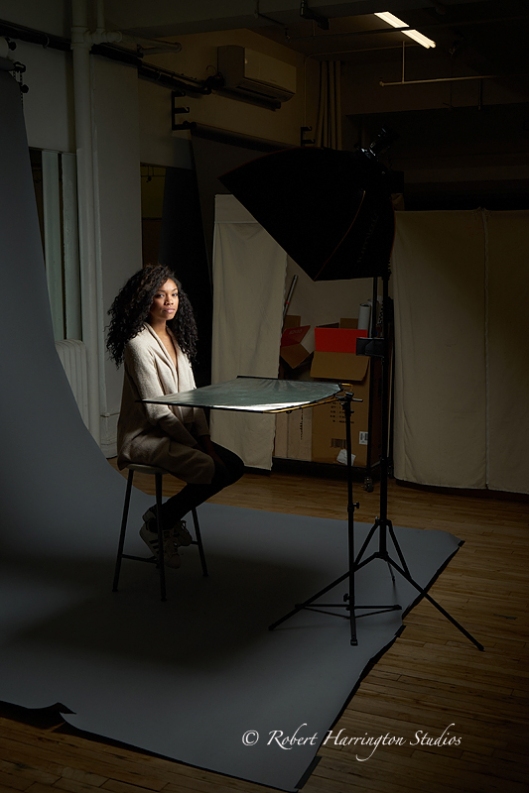
The great thing about the CS system, is that it is based on an aluminum tube frame so that it is sturdy, the fabric stays taut, and you can attach it to a light stand so you can work alone.

_RVH2774


_RVH2740 web

However, attaching it to a light stand can be tricky since CS discontinued their Grip Head Pro a few years back in favor of the new Enterprise bracket, which is cumbersome at best.  But there is a workaround!

The original Grip Head Pro was a traditional 2.5 inch grip head with a hole just the right size for the CS tube, which is a metric size:

A_RVH8646

B_RVH8643

This wonderful and small bracket, and if you are reading Amy, my CS contact, you need to bring that back into production, was replaced by a bracket called the Enterprise.

The Enterprise allows you to attach either of the CS tube sizes: the small for reflectors and the large for the Sun Swatter or other products.  This unit is big, bulky, and does not fit into your bag well:

C_RVH8647

D_RVH8644

But here’s the workaround: Purchase a Matthews 2.5″ Grip head, use Matthews as the head is made of brushed aluminum and then simply bring it to a machine shop with a tube section from your CS reflector.  For the about $40.00, a 12 pack of beer, or a Box of Joe and some donuts, you can have the original grip head for less money.  And it works!!

E_RVH8648

F_RVH8649

G_RVH8645

It is important to bring a tube sample from the reflector so the machinist can match the tube size.

This is a great solution to fix the problem and get that reflector on a light stand so you can work alone.

Matthews 2.5″ Grip Head

Thanks and till next time, keep reflecting!